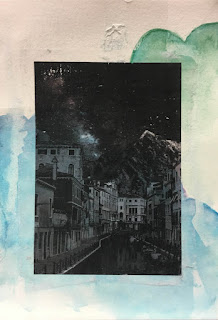
Watercolor Transfer Printing Process
Watercolor Transfer Printing Process
Steps:
- Abstractly watercolor two pieces of watercolor paper. (optional: cover the whole thing with Mod Podge so the paint doesn’t come off later)
- Find the image you want to use and reflect it. (it will be the correct direction when finished)
- Print out two copies. (one in color and one in grayscale)
- Cut them out, leaving about a half inch of white paper around the perimeter.
- Thickly paint Mod Podge onto the image.
- Stick the photo face down onto your watercolor.
- Smooth it out and press it down using a squeegee. (wipe up the Mod Podge that leaks out from the sides)
- Let it dry for a little bit.
- Get a cup of water to remove the paper with. (a trash can would be helpful to have close because of the mess)
- Dip your fingers in the water and put it on your project. (not too much)
- Rub where the water is and you should start seeing the image again. Make sure to use the pads of your fingers, not your nails (they will scratch the photo off)
- You may have to let it sit and come back again with more water later. (your fingers are going to hurt a little bit after all this)
- You’re done!
Reflection:
I think it went well in the beginning. I did a good job doing watercolor, reflecting my photo, and applying it to my paper. When it was time to rub off the top layer, I ended up getting the image pretty clear. Unfortunately, I also rubbed off some of my watercolor (and the watercolor paper too).


Comments
Post a Comment